Skip to content
View our Accessibility Statement
Skip to product information
1 of 16

Wyze Cam Pan v4

Wyze Cam Pan v4

Capture your life in 4K.

2025 Bestseller
Trusted in Millions of Homes

4K Color Night Vision

Pan and Tilt

Dual Band WiFi

AI-Powered

Motion Tracking

Wyze Cam Pan v4 (Color)
Pack
$59.98
Quantity: 1
1
2
3
4
5
6
7
8
9
10
In stock
Get it as soon as
30-day hassle-free returns.
In stock
$0.00 FREE / 1 month
14-Day Cloud Storage
Smart Detections & Notifications
Subscriber Discount

*Cam Plus subscription auto renews at $2.99/month/cam after the first month. No commitment, cancel anytime. Plan is not compatible with existing Cam Plus Unlimited plans.

The #1 best-selling 360° pan & 180° tilt Wyze camera is now back with 4K Ultra HD quality.

Requires Wyze app version 3.7

View full details
  • 4K Ultra HD Video Resolution

    Capture every detail with crystal-clear recording.

  • 360° Pan and 180° Tilt Coverage

    Control remotely via the Wyze app for full-room coverage.

  • AI-Powered Object Tracking

    Person, pet, and vehicle tracking with customizable priority.

  • Dual-Band Wi-Fi

    Maintain a strong connection on both 2.4 and 5 GHz networks.

Wyze Cam Pan v4 Tech Specs

Color & Materials
  • Color: White
  • Finish: Textured Matte
  • Materials: Body: Polycarbonate, Lens: Glass + plastic
Dimensions
  • Dimensions (H,W,D): 4.91in x 2.48in x 2.17in (124.7mm x 63mm x 55mm)
  • Weight: 274.8 g (0.61 lbs)
Video
  • Resolution: 4K/8MP Resolution (3840 x 2160)
  • Field of View: 105.4° (D), 88° (H), 46° (V)
  • Pan Tilt Range: 360° (H) x 180° (V)
  • Video FPS: Daytime - 20 fps, Nighttime - 15 fps
  • Digital Zoom: 8x
Audio
  • Built-in 100dB speaker & microphone
Power
  • 6 ft (1.8 m) Flat Type-C to USB-A
  • Power adapter: Input - 110-240V (AC), Output - 5V/2A
Addition Details
  • Night Vision: 2 IR LEDs (850 nm) + White Spotlight LED (60 Lumen)
  • Color Night Vision
Sensor
  • Image sensor: 1/2.7' CMOS
Storage
  • Supports up to 512GB local storage (microSD card required - sold separately)
  • Cloud (AWS) with Wyze Security Plan
Temperature
  • Storage Temperature: -4°F-122°F (-20°C-50°C)
  • Operating Temperature: -40°F-158°F(-40°C-70°C)
Weather Resistance
  • IP65 Weather Resistant
  • Indoor/Outdoor* compatible
Note: *Requires Wyze Universal Outdoor Power Adapter (sold separately, learn more).
Connectivity & Compatibility
  • Wi-Fi: 802.11a/b/g/n/ac/ax, 2.4/5 GHz, Wi-Fi 4/5/6
  • Phone app support: Android 10.0+, iOS 16.0+
  • Integrations: Alexa, Google Assistant, IFTTT
Languages
  • English
Warranty
  • 1-Year
Note: Wyze app 3.7 is required
  • Wyze Cam Pan v4 x1
  • 6' USB Type-C to Type A Cable x1
  • Power Adapter x1
  • Mounting Bracket & Kit x1
  • Quick Start Guide x1

Wyze Cam Pan v4 is not battery-powered; it runs on a 1.8 m (6 ft) USB-A to USB-C cable and connects via Wifi.

Great question! To use Wyze Cam Pan v4, you will need Wyze app version 3.7
Available in both Apple and Google Play store. 

You asked, we answered: 4K Ultra HD (3840 x 2160).

The entire camera rotates, and the top lens points down. When it turns off, the entire camera rotates back to its original position.

Day: 20 FPS + 10 FPS for low light; Night: 15 FPS.

Yes, Wyze Cam Pan v4 is IP65-rated and can be used both indoors and outdoors. Just be sure to cover the SD card slot to avoid water damage. Wyze Universal Outdoor Power Adapter (sold separately; learn more) is required for outdoor use.

No, the included power cable is not outdoor-rated or waterproof, and it is not intended for outdoor use. To use your Wyze Cam Pan v4 outdoors, you'll need a Wyze Universal Power Adapter (sold separately; learn more).

Yes, Wyze Cam Pan v4 supports both 2.4 GHz and 5 GHz networks.

Yes, Wyze Cam Pan v4 supports Wyze Web View. (Requires a subscription to Cam Plus, Cam Unlimited, or Cam Unlimited Pro)

Currently, no. However, Wyze Cam Pan v4 will be compatible with Wyze Lamp Socket v2 soon. Keep an eye out for the upcoming app release. 

Wyze Cam Pan v4 is equipped with a starlight sensor that allows the camera to see in full color at night. To use it, turn off Night Vision in the Wyze app in low light conditions.

It’s normal for the top of your Wyze Cam Pan v4 to feel warm to the touch while it’s operating. The internal components are working as intended! For safe handling, especially when moving the device, please hold it from the camera’s base.

Small camera device with water droplets on a dark surface

Now Available in Black.

Your 4k view just got a whole lot darker.

Capture life in stunning 4K Ultra HD Resolution.

Crystal-clear video recording with a wide field-of-view captures every detail, day or night.

Real in-cam photos from Cam Pan v4

More pixels captured than ever before. It's about the details.

Experience the difference, never miss a thing.

1080p

Cam Pan v4 (4k Ultra HD)

Follow only what matters with AI-Powered Object Tracking.

Person, pet, and vehicle tracking with customizable priority means Pan v4 follows the motion that’s important to you (and ignores the rest).

Dual-Band Wi-Fi

Faster, stronger connections.

Connecting your camera is easy and faster than ever with dual-band Wi-Fi that supports both 2.4 and 5 GHz networks.

ip65 weather resistance

Place it anywhere.

Wyze Cam Pan v4 is IP65 weather-resistant*, so it can operate in any weather.

*Note: Outdoor use requires Wyze Cam Universal Outdoor Power Adapter (sold separately, learn more).

Integrated spotlight + Siren

More safety at night.

Want to see a robber wet their pants in 4K? Enable the motion-activated spotlight and motion warning. Or activate the 100dB siren.

Record every second

24/7 recording with a MicroSD Card.

Don’t miss a thing with continuous local recording to a microSD card up to 512 GB. No subscription required.

*Note: MicroSD cards sold separately.

LEVEL UP YOUR CAM ✨

Get total peace of mind by saving event videos to a secure cloud.

60-day cloud video backups, AI Video Search, Descriptive Alerts, and more.

Note: Wyze Cam Pan v4 works with Cam Plus, Cam Unlimited, and Cam Unlimited Pro.

Learn more about compatible plans

Privacy Mode

Physical Privacy Mode.

Enable Privacy Mode in the Wyze app, and the camera lens points straight down to eliminate its field of view and turns off.

Connect with bluetooth®

Easy to set up.

No need to scan QR codes. Enjoy hassle-free setup with Bluetooth®. Your cam will be up and running within minutes.

Plug it in and go

Versatile mounting.

Four unique mounting options gives you the flexibility to secure your space exactly how you need to.

Works with smart assistants

Alexa, Google Assistant, IFTTT support.

Convenience and customization at your fingertips with integrations like Amazon Alexa, Google Assistant, IFTTT, and Wyze Automations.

Patrol your room with Pan Scan.

Set the camera’s patrol route with up to 4 custom waypoints.

You gotta see it to believe it.

Your life in 4K. Check out the unboxing video if you're curious about what's in the box or if you miss Kyle.

Even more features to love.

We made your favorite pan camera even better.

Maintain a stronger and more reliable connection at greater distances. Wi-Fi 6 router required.

Look & listen for motion & sound. Wyze Cam Pan v4 sends your phone an alert and begins recording when either is detected.

Monitor specific areas for motion so you only receive notifications when it matters.

Receive an alert the moment Wyze Cam Pan v4 hears a Smoke or CO alarm go off. Wyze Cam records a video during this time.

Getting Started Guides for Wyze Cam Pan v4

Download the Quick Start Guide for Wyze Cam Pan v4 in this article.

Below is the Quick Start Guide for Wyze Cam Pan v4, a short manual on how to get started.

This guide is a short user manual with the basics about Wyze Cam Pan v4, including:

  • What's in the box for Wyze Cam Pan v4.
  • How to download the Wyze app.
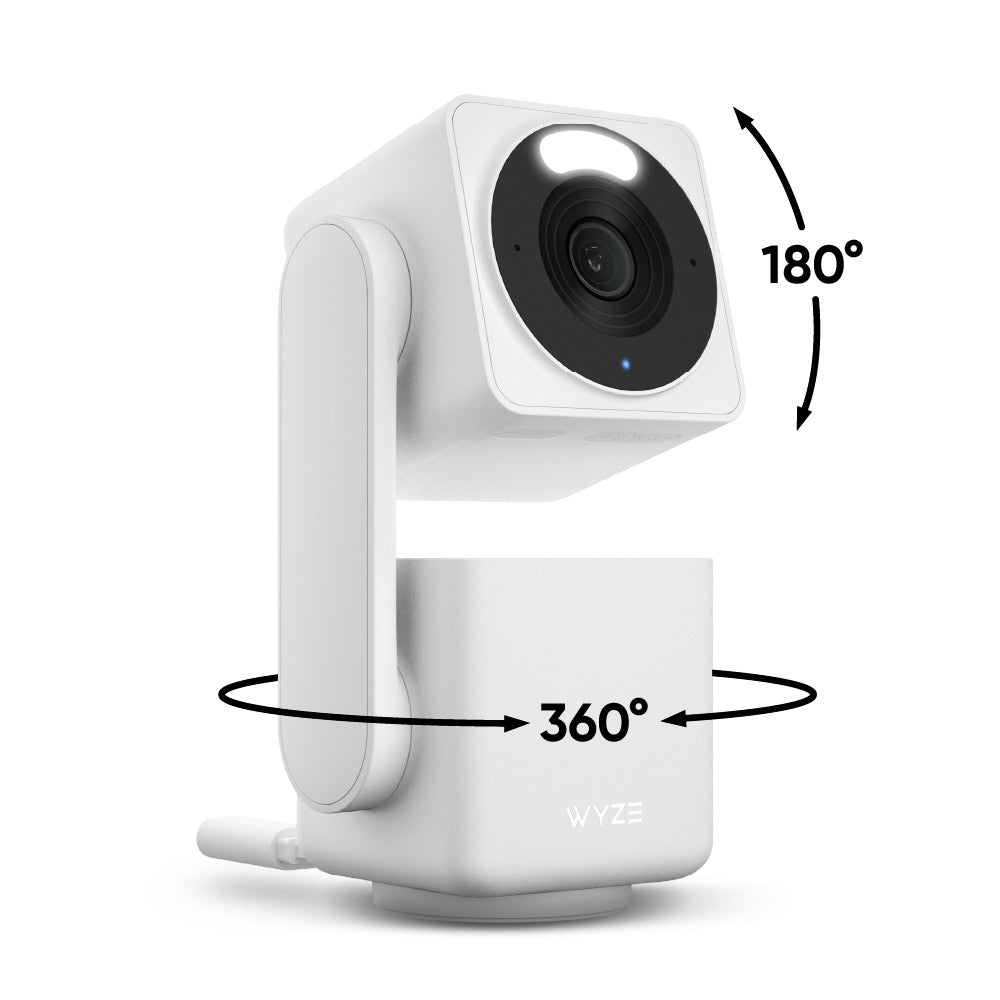
  • A diagram of Wyze Cam Pan v4.
  • How to set up Wyze Cam Pan v4.
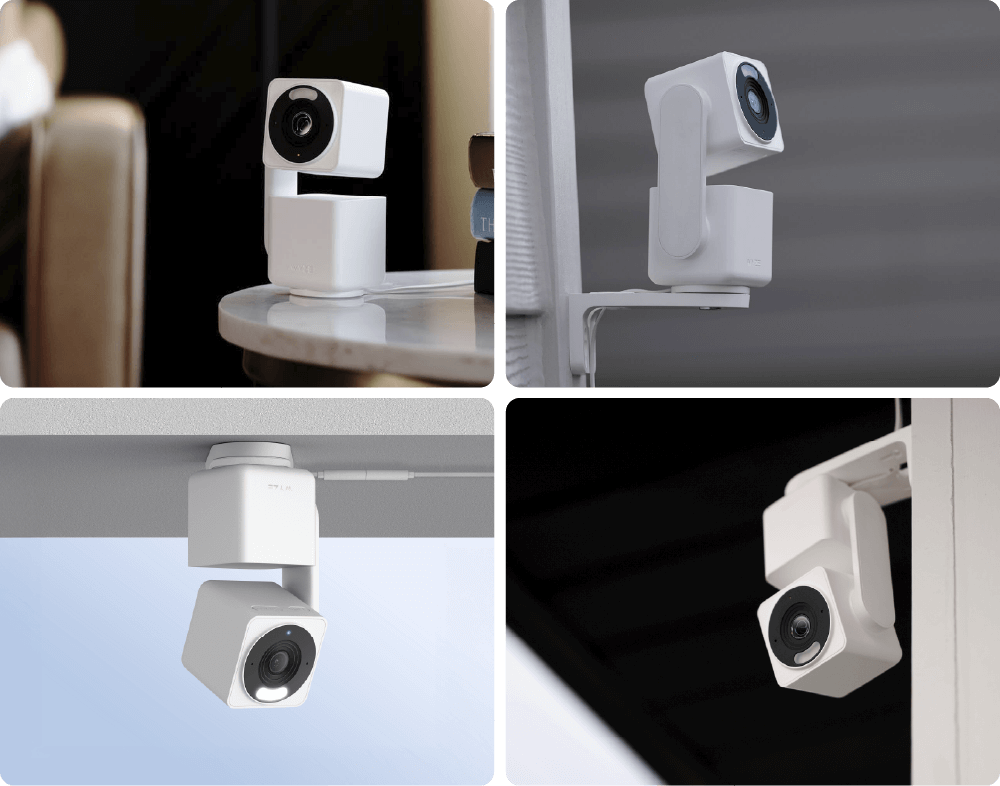
  • How to mount Wyze Cam Pan v4.
  • How to read the status lights.

Before you begin setup:

  1. Download the Wyze app on your smartphone or tablet.
  2. Connect your device to a 2.4 GHz or 5 GHz Wi-Fi network, and enable BluetoothⓇ.
  3. Unpack your Wyze Cam Pan v4 box, removing all plastic and packing materials.Be sure to remove the plastic film from the lens.
  4. Plug the camera into power using the included USB cable and power adapter.The camera’s status light will turn solid red when powered.

To set up your Wyze Cam Pan v4:

  1. In the Wyze app, tap Home, then tap + plus sign on the top right.
  2. On the Add menu, tap Device.
  3. Tap Cameras > Pan and Tilt Camera > Wyze Cam Pan v4.
  4. With your camera plugged into an outlet, tap Begin Setup in the app.
  5. The camera will say "ready to connect." In the app, check the box next to It said, “Ready to connect”.
  6. Tap Next.
  7. If BluetoothⓇ hasn't been enabled, you will be prompted to allow BluetoothⓇ access. Tap Okay.If BluetoothⓇ has already been enabled, it will skip to the next step.
  8. Select your 2.4 GHz Wi-Fi network and enter your network password. Tap Connect.Tap the icon in the password field to display the password to ensure it was entered correctly.
  9. Your device will connect automatically. Tap Next in the app.
  10. Once connected, you will be prompted select a mounting option.If you want to mount your camera now, choose a mounting option and follow along in the app.If not, tap Skip.
  11. Now it's time to set up your Home Waypoint, your cam's default view. Tap Continue.Your camera will calibrate. This should only take a few seconds.
  12. Once calibrated, tap Set to select your Home Waypoint. Then Next.
  13. Name your camera using the text field, or by choosing a suggestion.
  14. Tap Finish when done.
  15. Choose between the Basic plan (no subscription) or Cam Plus. Tap Continue.
  16. Set up some automations on the Things to Try* page, or tap Skip then Finish and Done.
  17. Enjoy your new Wyze device!

👉 Haven't set up your Wyze Cam Pan v4 yet? Check out Wyze Cam Pan v4 Setup Guide before installing.

There are 4 ways to mount your Wyze Cam Pan v4:

  • On a tabletop or flat surface.
  • On a wall, right-side up.
  • On a wall, upside down.
  • On a ceiling, upside down.

You can follow along in the Wyze app during Wyze Cam Pan v4 setup, or go to the Pan v4 Settings > Mounting Guide to get started.

To mount your camera on a flat surface:

  1. Set your camera on a flat surface.Check your Wi-Fi strength in the Wyze app.We recommend setting it on a horizontal surface, not angled.We recommend mounting it at the edge of the surfaceYou do not need to use the mounting kit.

To mount your camera on a wall:

  1. For a detailed walkthrough, follow along in the Wyze app during setup.If you skipped mounting during setup, go to your Pan v4 Settings > Mounting Guide > On a wall with the base down or On a wall with the base up.
  2. Gather your tools for mounting.Get the Mounting Kit and Wall Bracket from the box.You'll need a Phillips-head screwdriver, an electric drill, and potentially a ladder.
  3. Attach your Wyze Cam Pan v4 to the Wall Bracket.Get the Short Top Screw from the mounting kit and Wall Bracket, along with your screwdriver.Attach the Pan v4 to the grooved side of the wall bracket using the short top screw.Not the smooth side, flip it over to the textured side.
  4. Choose your installation location.Check your Wi-Fi strength at your mounting location.We recommend mounting your camera at least 1 foot from the ceiling to avoid spotlight glare.Ensure your mounting location isn't facing a busy area, like a road or moving trees.
  5. Mark the holes at your mounting location.Affix the Mounting Sticker to your mounting location.Mark the position of the holes with a pencil.
  6. Drill the holes at your mounting location.Pre-drill the holes to be 1/4 inches in diameter and 1 and 3/16 inches deep.Insert the expansion tubes into the holes.Screw in the wall screws into the expansion tubes, leaving a 3/8-inch gap between the screw head and the wall, so the wall bracket can hang from the screws.
  7. Place the Wall Bracket and camera over the screws, then screw into the expansion tubes to secure.If mounting with the base down, the smooth side of the bracket will face down. Route the camera's pigtail through the wall bracket to secure it.If mounting with the base up, the smooth side of the bracket will face up. Do not route the pigtail through the wall bracket.With your camera upside down, you will have to rotate the image in your settings.In the Wyze app, tap on the Settings gear > Advanced Settings > toggle on Rotate Image 180°.
  8. Attach power cable into the camera's pigtail, then plug the USB end into the adapter. Lastly, plug the adapter into a power outlet.When powered, the status light on the camera will light up.

To mount your camera on the ceiling:

  1. For a detailed walkthrough, follow along in the Wyze app during setup.If you skipped mounting during setup, go to your Pan v4 Settings > Mounting Guide > On a ceiling.
  2. Gather your tools for mounting.Get the Mounting Kit and Wall Bracket from the box.You'll need a Phillips-head screwdriver, an electric drill, and potentially a ladder.
  3. Attach your Wyze Cam Pan v4 to the Wall Bracket.Get the Short Top Screw from the mounting kit and Wall Bracket, along with your screwdriver.Attach the Pan v4 to the smooth side of the wall bracket using the short top screw.Not the grooved side, flip it over to the smooth side.
  4. Choose your installation location.Ensure there's at least 13/16-inch clearance around the camera.Check your Wi-Fi strength at your mounting location.Ensure your mounting location isn't facing a busy area, like a road or moving trees.
  5. Mark the holes at your mounting location.Affix the Mounting Sticker to your mounting location.Mark the position of the holes with a pencil.
  6. Drill the holes at your mounting location.Pre-drill the holes to be 1/4 inches in diameter and 1 and 3/16 inches deep.Insert the expansion tubes into the holes.Screw in the wall screws into the expansion tubes, leaving a 3/8-inch gap between the screw head and the wall, so the wall bracket can hang from the screws.
  7. Place the Wall Bracket and camera over the screws, then screw into the expansion tubes to secure.
  8. Route the camera's pigtail through the wall bracket to secure it.
  9. Attach power cable into the camera's pigtail, then plug the USB end into the adapter. Lastly, plug the adapter into a power outlet.When powered, the status light on the camera will light up.
  10. Because your camera is upside down, you will have to rotate the image in your settings.In the Wyze app, tap on the Settings gear > Advanced Settings > toggle on Rotate Image 180°.

Additional Note: We recommend mounting your camera vertically upright or upside down. We do not recommend mounting your camera at an angle or side ways.

You'll find the status light on the front of your Wyze Cam Pan v4. No light? Make sure it's properly connected to power.

⚡️ All Wyze devices have a handy status light that helps determine what state the device is in.

Wyze Cam Pan v4 Status Light Guide

  • Solid red - The camera is powered on and initializing, recording an event, or you are watching the live stream.
  • Flashing red - The camera is ready to connect.
  • Flashing red and blue light - Connection is in progress.
  • Flashing blue light - The camera is connected and finishing setup, or updating its firmware.
  • Solid blue light - The camera is powered and fully connected.
Added to your cart
FREE shipping on orders $59+
Subtotal
$0.00
View cart